
Studio A Training – Basic
Studio A in the Media Center of Wallis Annenberg Hall is a cutting-edge hub to experiment, create and innovate. This training shows you how to operate the video and audio equipment in Studio A.
Level 1 Options
- One or two people on the set
- Use of three cameras: One wide shot, two single shots
- Ability to connect and display laptop
- Use of the forum or black curtain as the background
- You can record a production such as an interview, topical show, or podcast.
Ground Rules
- NO food/drinks (other than sealed water bottles) are allowed in Studio A.
- Never rotate the set. You could hurt yourself or damage the wires under the platform.
How to Reserve Studio A
- Open an Incognito/private Window in Google Chrome
- Go to annenbergprograms.com/studioa.
- Continue as a guest and select a date and time. Hit submit.
- Only individuals that have received training are authorized to book studios. If you’re not on the authorized list, your booking will be canceled.
- Email asctech@usc.edu to request training or to request a reservation time outside of normal open studio hours.
Get Started
Reduce the Reflection
Look at the large monitor on the right. There is usually some reflection coming off the forum window. Pull down the black window shade on the outside-facing window to reduce the reflection.
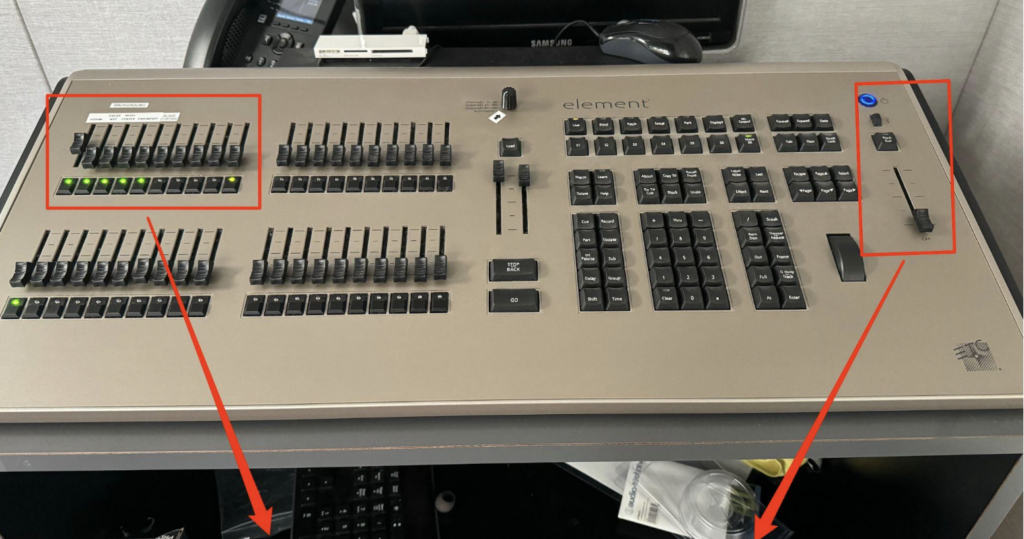
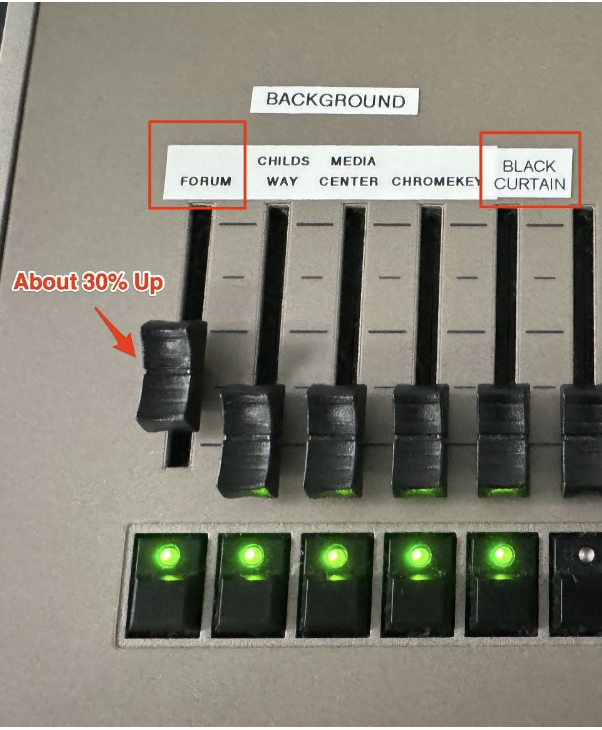
Set Up Lighting
- On the lighting board next to the door, pull up the FORUM slider located on the left side.
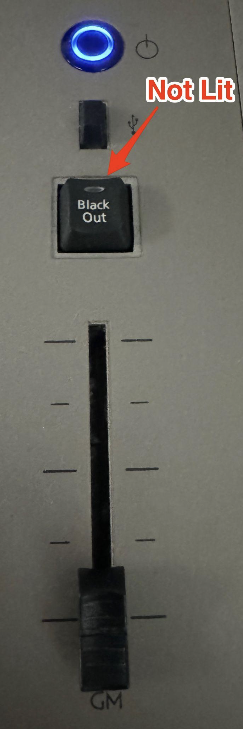
- Generally, pushing the slider up about 30 percent is sufficient. If the slider does not respond make sure the Black Out button on the right side of the lighting board is not lit.
- Also you may use the BLACK CURTAIN slider as a background if you decide to cover the forum window with the black curtain.
Set Up Microphones
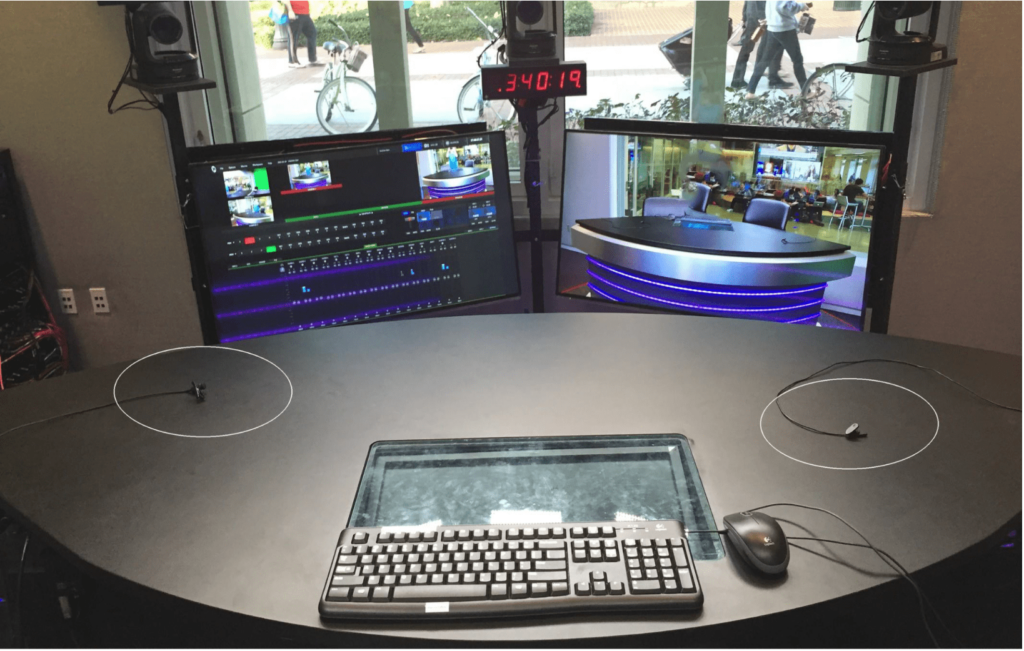
- Locate the TWO wired microphones connected to the sides of the desk.
- Clip a microphone on the center of your shirt or on your shirt lapel.
- Position the mic to face the direction in which you will be talking most of the time.
- If you are talking to a co-anchor/guest, place the mic on the side closest to that person.
- Make sure hair or jewelry does not cover the mic, so as to avoid any interference.
- The microphone works best when it is clipped 6-inches below your chin.
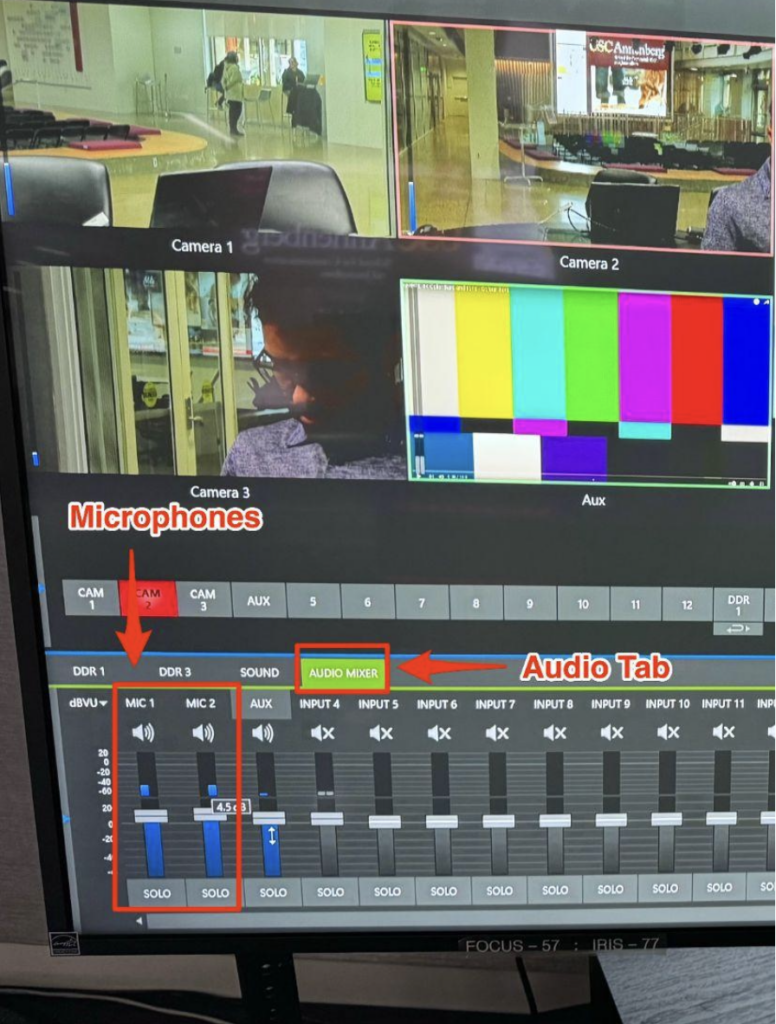
Adjust Microphone Levels
- Click the AUDIO MIXER tab in the bottom section of the TriCaster. It will turn green.
- Have each person wearing a microphone speak at the level they will be talking during the interview or show.
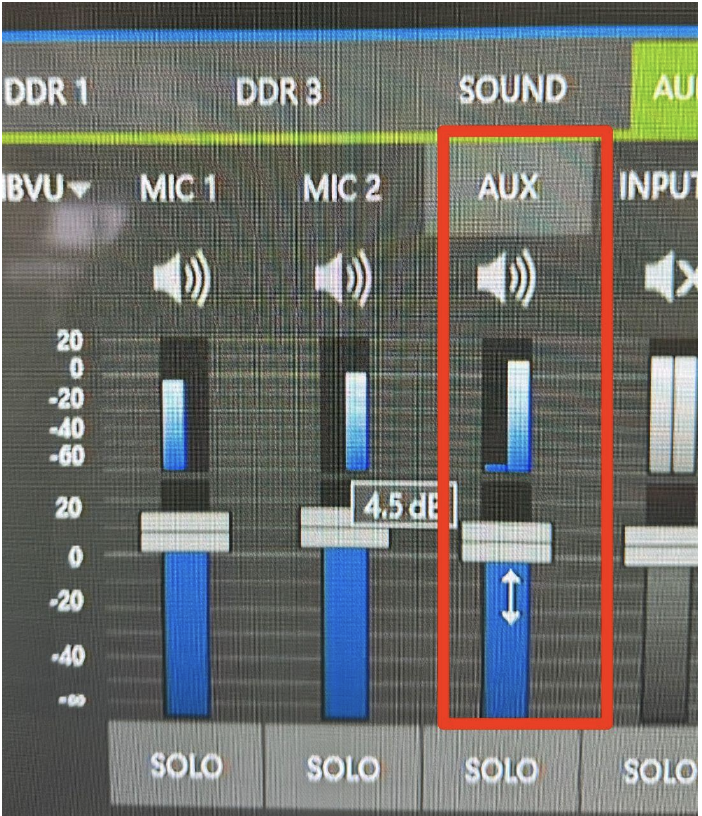
- Use the mouse to adjust MIC 1 (Left Microphone) and MIC 2 (Right Microphone) by clicking and dragging the sliders up or down.
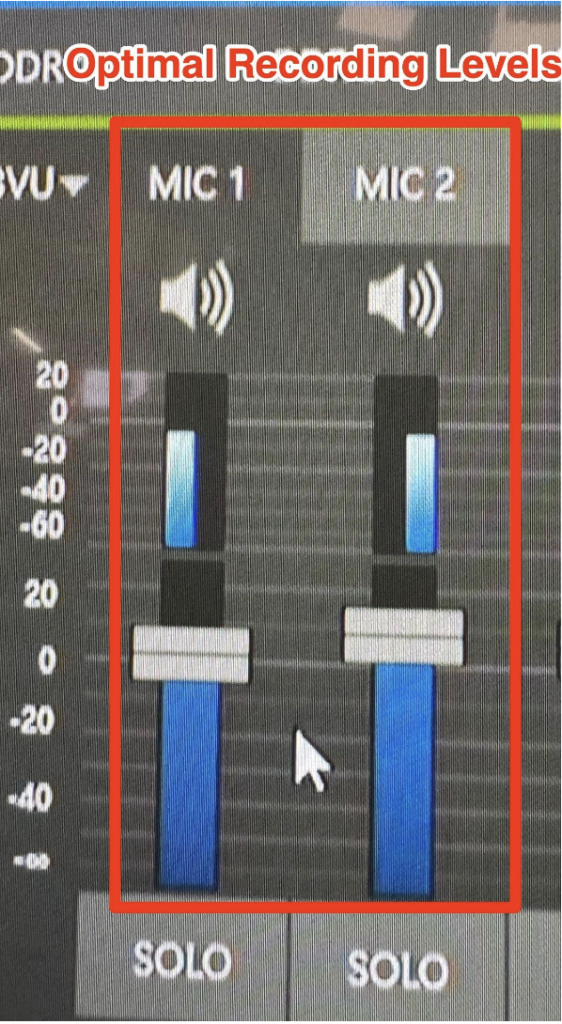
- The peak height of the volume bar should be hovering a little below 0db on the meter (refer to the picture below for optimal levels).
- The two microphones MUST be consistently at the same level. It’s okay if the levels goes above 0db at moments.
Laptop Setup
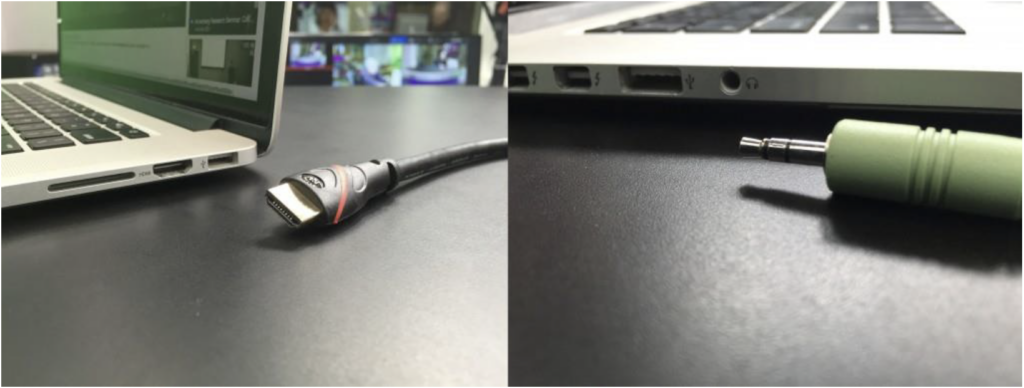
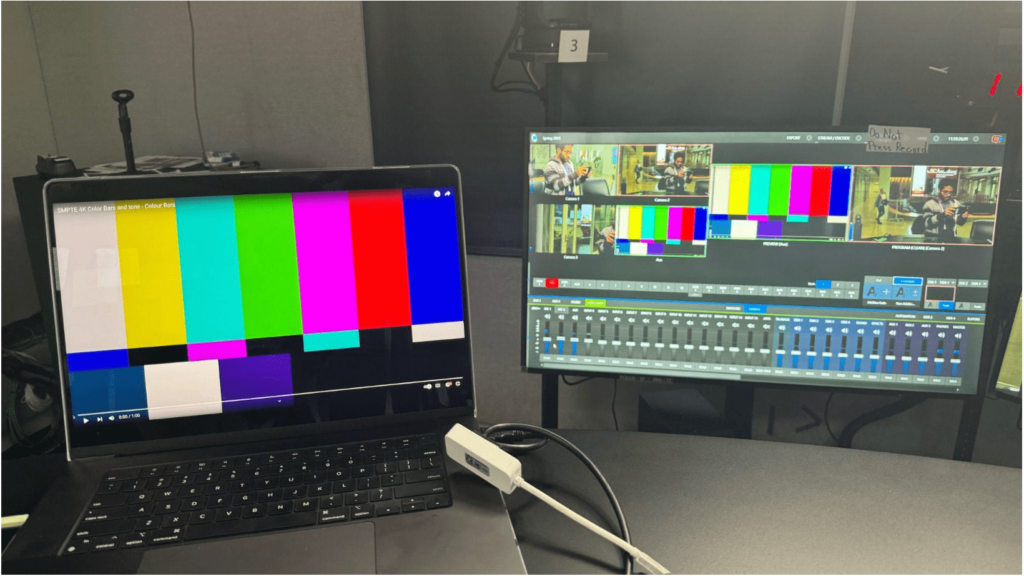
You can use a laptop or any other device with an HDMI or USB-C output to play graphics, videos, or video-call interviews (Check your sleep settings so the laptop doesn’t shutdown during the recording).
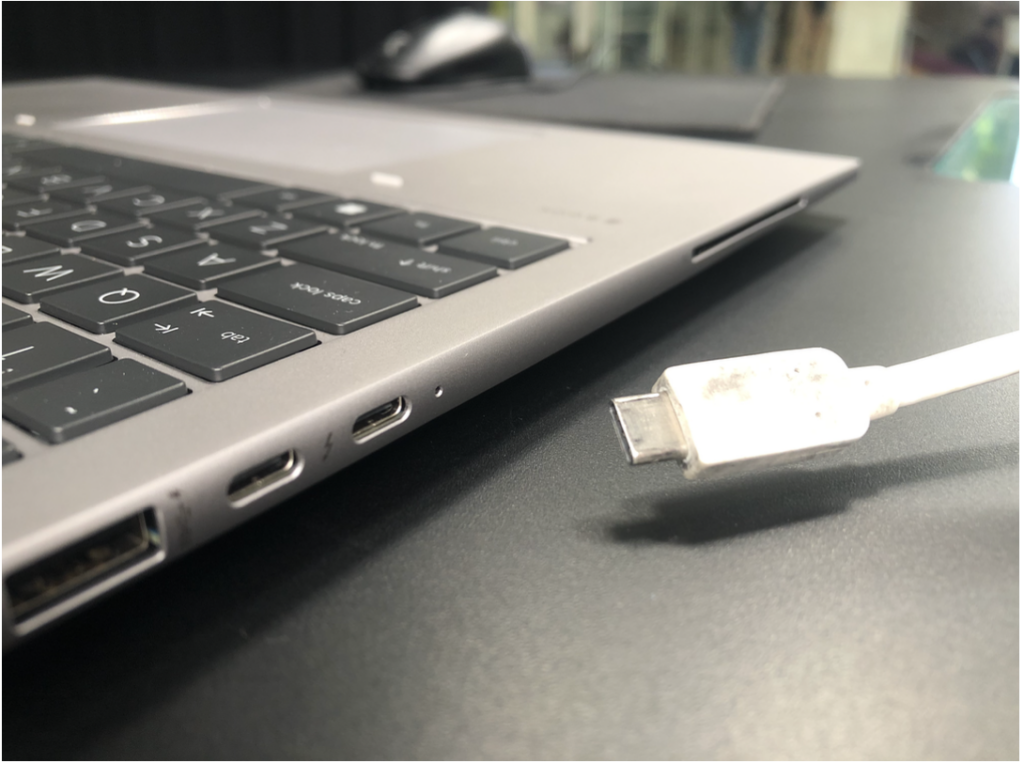
- On the left side of the anchor desk is an HDMI cable with a USB-C adapter.
- Plug the HDMI cable with the USB-C adapter into your device. Use or remove the USB-C adapter depending on your laptop’s available ports.
- Plug the mini headphone cord into the laptop’s headphone jack (this is necessary for sound).
- Your laptop screen should pop up in AUX on the TriCaster.
- Under the AUDIO MIXER tab in the bottom of the TriCaster Interface, adjust the audio levels appropriately.
Frame Camera Shots
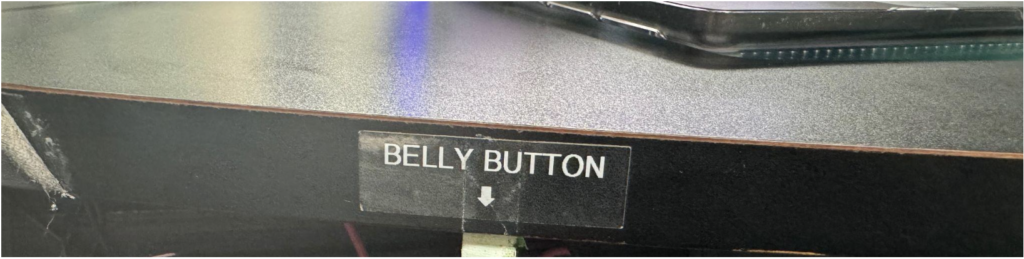
1. Before recording make sure that the people on set are in the correct starting position. Use the BELLY BUTTON tape to align yourself horizontally with the anchor desk.
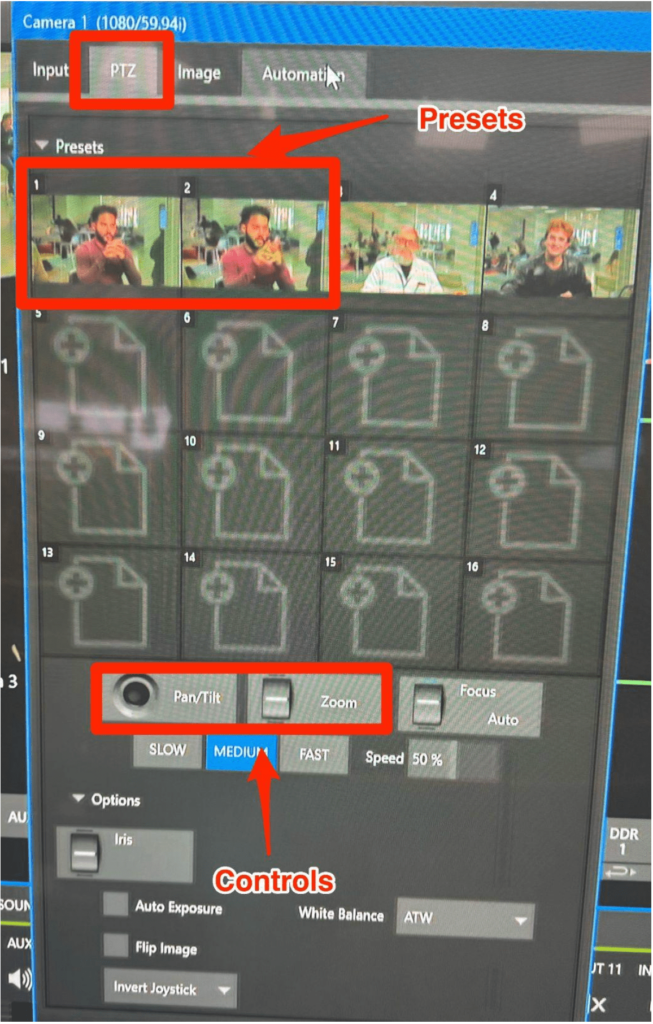
2. Click on the gear icon on the bottom right of CAMERA 1 and a new window will appear.
3. In the new window, click on the PTZ tab. You will see several controls, ONLY adjust the zoom and pan/tilt controls and frame the shot so the subject is center framed. You may also use one of the camera presets to help adjust the shot. Now adjust CAMERA 2 and CAMERA 3 the same way.
Record Your Show
Switch Between Cameras
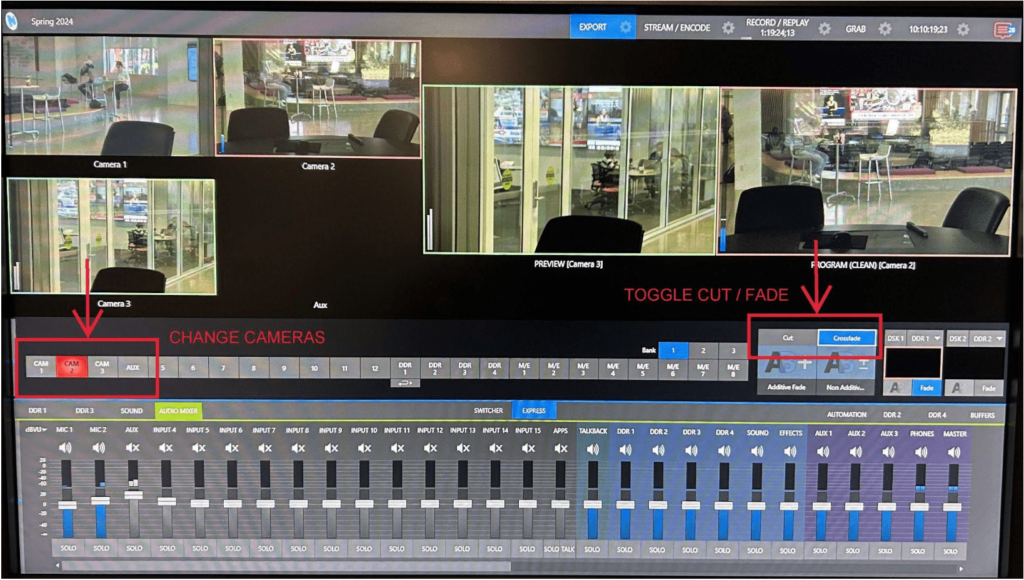
- During your program, you can switch between the three cameras and the laptop using the Xkeys stick or the source panel in the middle of the screen.
- Push CAM 1, CAM 2, CAM 3, or AUX 4 on the stick or source panel to switch cameras in PROGRAM.
- To add a FADE, transition back and forth between your cameras and laptop.
- Push the Prev4 button on the stick to put AUX (laptop) in the PREVIEW window.
- Push FADE on the stick to fade from PREVIEW to PROGRAM.
- Practice cutting between shots and using FADE to fade back and forth to the laptop. This is a good technique to practice so you don’t have to look down during your show.

Record Using Hyperdeck Box
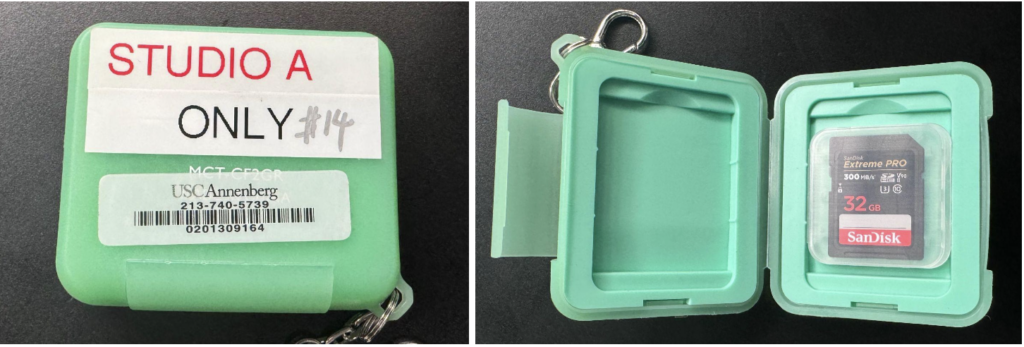
1. You will need an SD card to record. To receive a properly formatted card, go to the equipment room on the lower level of Annenberg and ask for a SD card for Studio A.
2. You may erase any previous files on the SD card. Then insert the SD card into the hyperdeck located in the right corner of the anchor desk. Then hit record on the device.
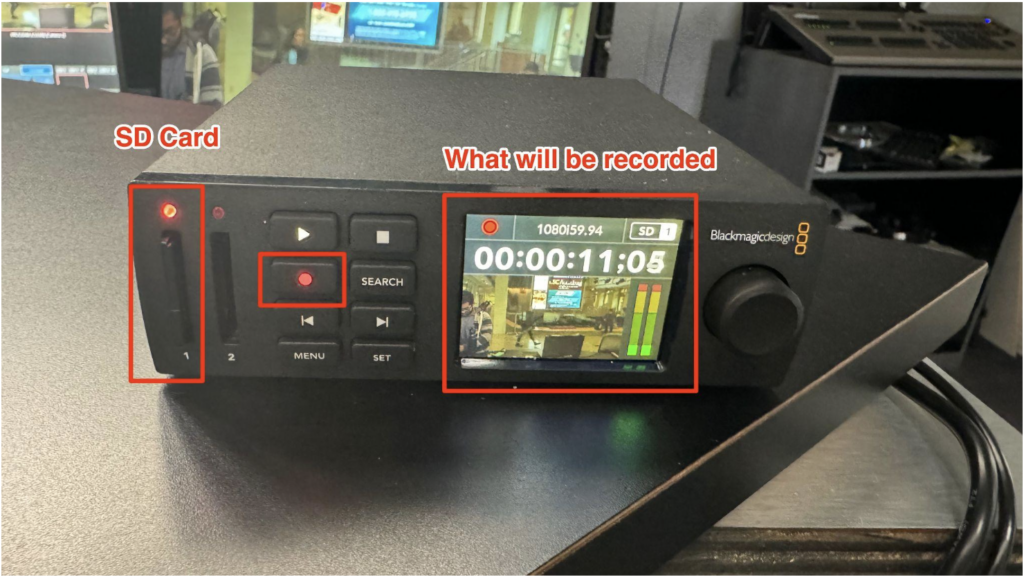
3. Once you are done recording, hit the STOP button on the hyperdeck and eject the SD card.
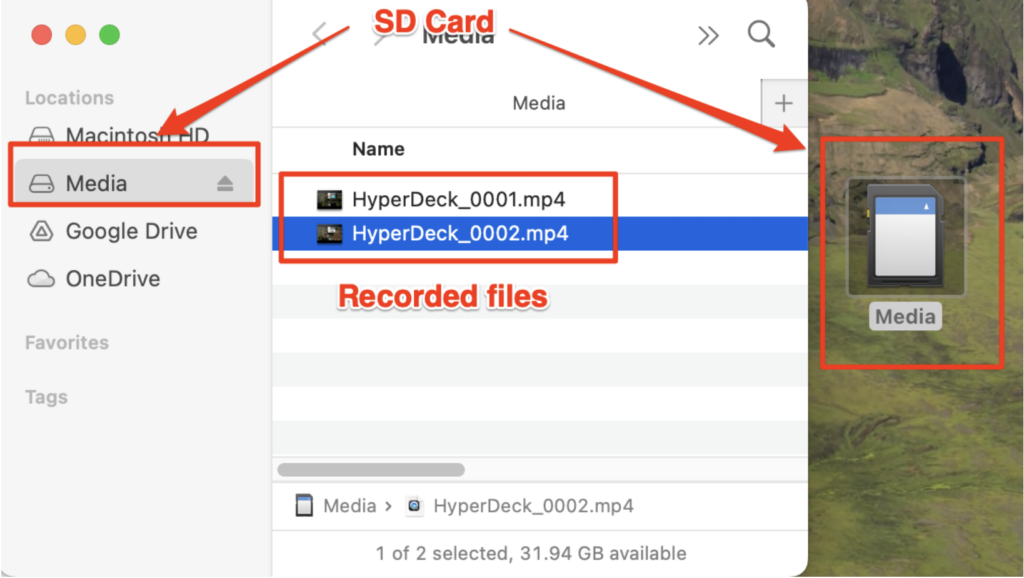
4. Copy the MP4 file of your recording from the SD card to your storage device.
5. It is good practice to do a test recording (30-60 seconds) to make sure the equipment is working correctly and you are recording both audio and video.
Upload and Submit to XChange
NOTE: Your Xchange login should be the same as your USC shibboleth/email login. If you’re having any difficulties, please contact asctech@usc.edu.
PLEASE USE A CHROME BROWSER FOR XCHANGE!!!
1. Go to ann-xchange.usc.edu. Login with your USC Net ID (the first part of your USC email) and unique password. Please read the note above if you’re unable to login.
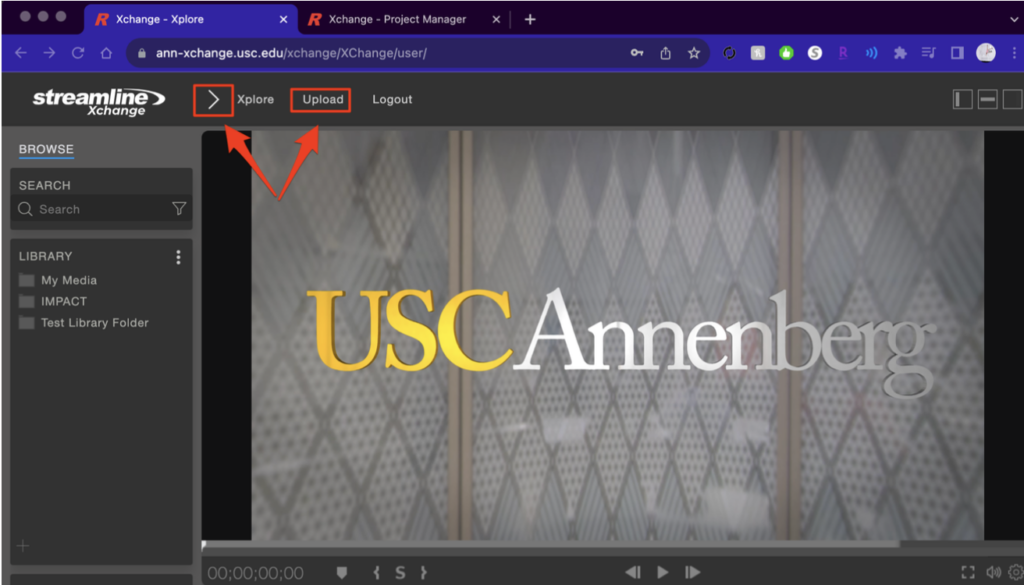
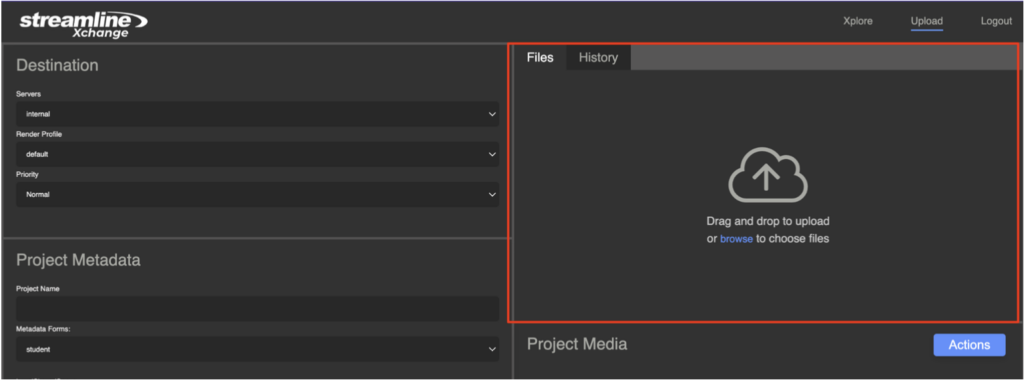
2. At the top-left of the Xchange home page, click the white arrow to reveal three tabs and hit Upload. The Xchange upload manager will open up in a separate tab.
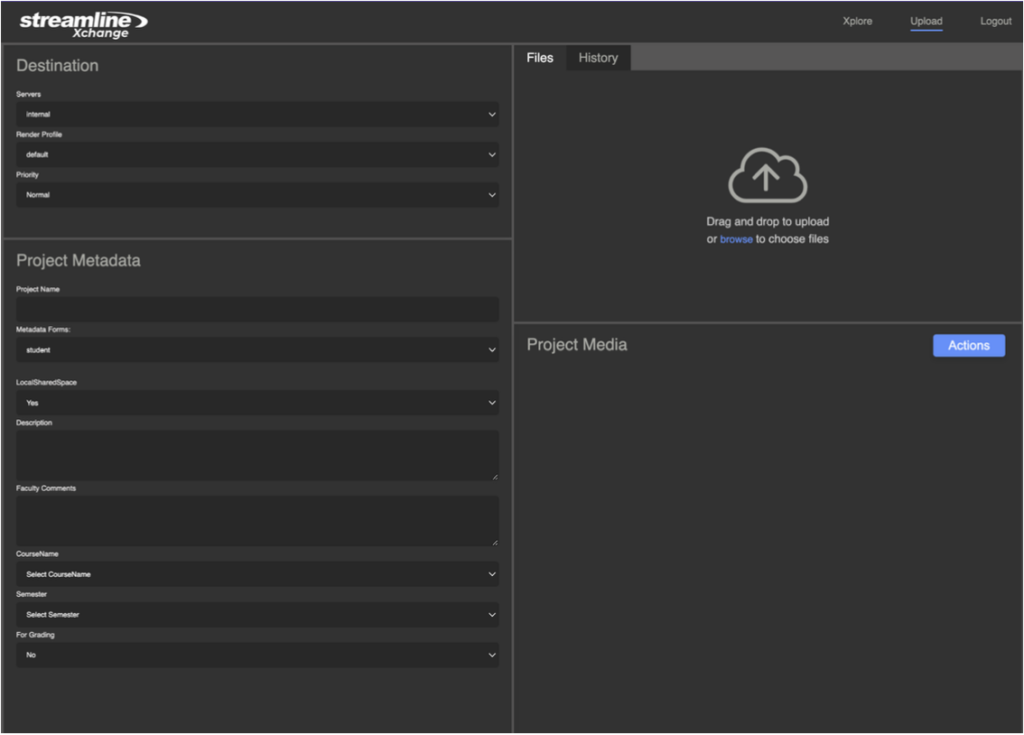
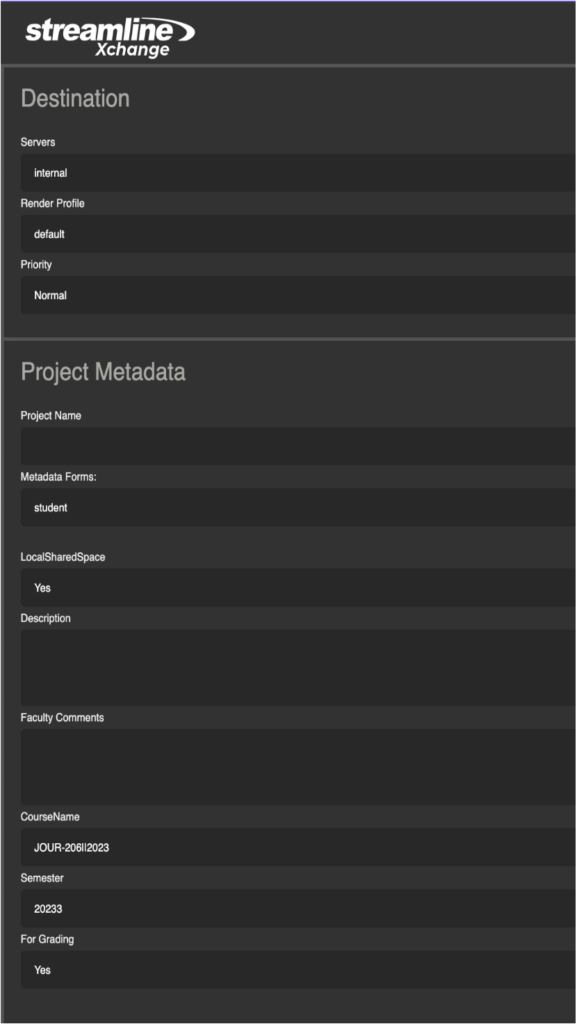
3. In the Upload Manager make sure the options in the picture below are selected. The default name of your media will be the uploaded filename.
Destination:
- Servers: Internal
- Render Profile: Default
- Priority: Normal
Project Metadata
- Metadata Forms: student
- Local/SharedSpace: Yes
- Description: Describe the media being uploaded
- CourseName: Course number and year (ex. JOUR206||2023)
- Semester: Course year + semester
- 1 = Spring
- 2 = Summer
- 3 = Fall
- For Grading: Yes
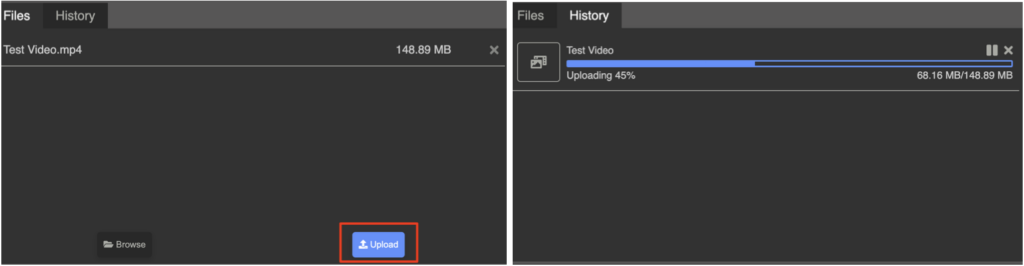
4) Click browse under the Files tab and navigate to your video file, then press Upload. Don’t close the Upload Manager until the media reads Finished in the Files tab.
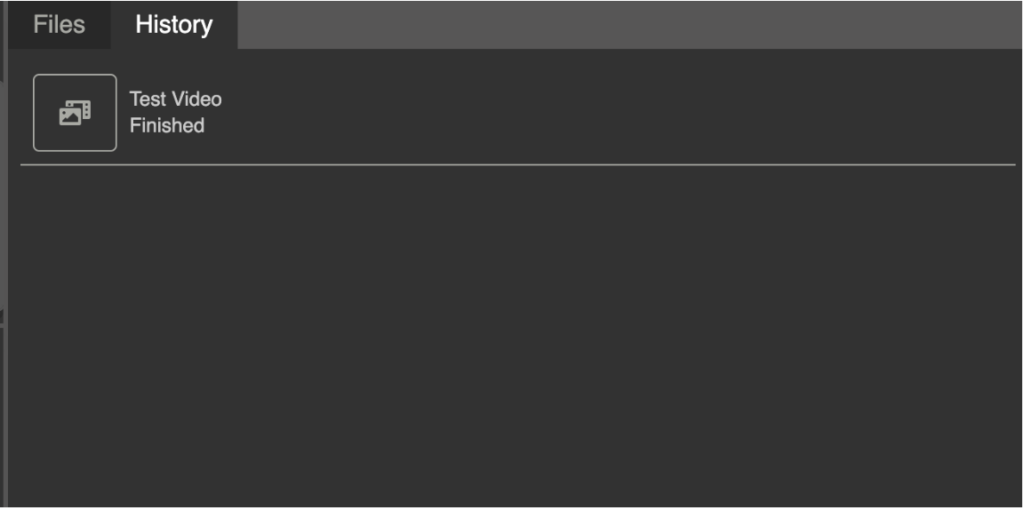
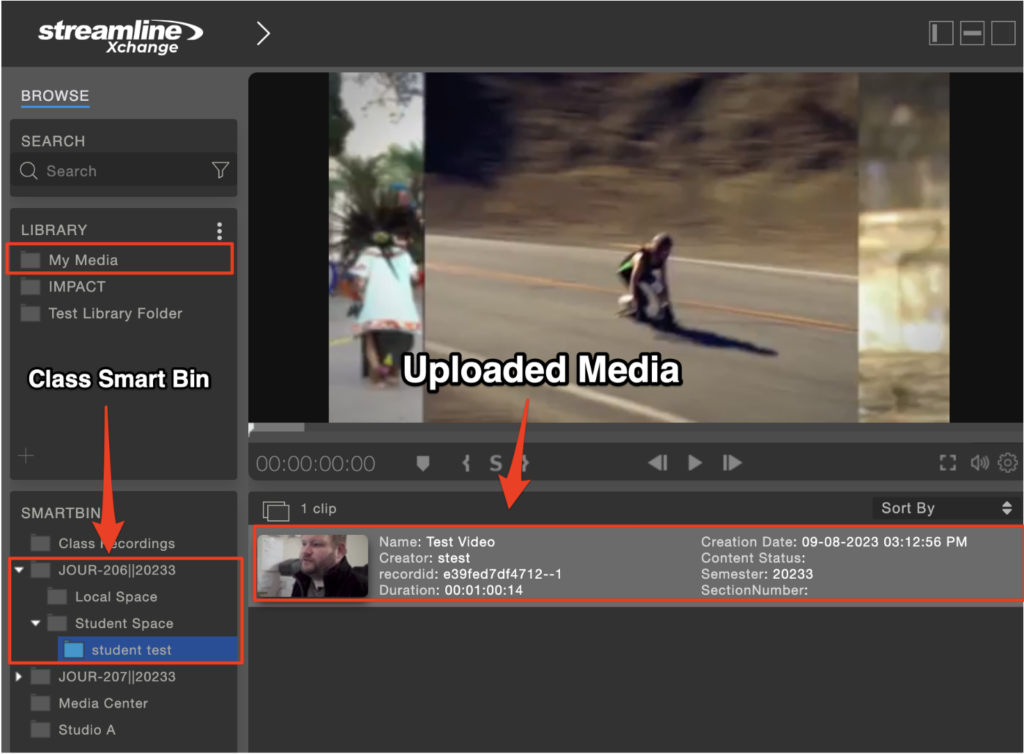
5) Once the upload is complete, the video will appear in your My Media folder under Library, as well as your Student Space folder within the course you selected in Step 4. It also appears in the faculty Grading Space but only faculty/staff associated with the class will be able to see this bin.
Important Tips
1. REHEARSE AS MUCH AS POSSIBLE
- Practice clicking back and forth between the cameras using the stick so you can avoid looking down while you are on camera.
2. TO SHOW A VIDEO OR GRAPHIC
- Cue up the first frame of your video or graphic on your laptop.
- Hit AUTO FADE to put the video or graphic into PROGRAM.
- Immediately hit play on your laptop to get your video rolling.
3. TO CONDUCT A VIDEO CALL INTERVIEW
- Prepare:
- Frame the interviewee properly ahead of time.
- Check the audio levels in the AUDIO MIXER tab while the interviewee is talking.
- Rehearse one question and answer while switching between camera shots and AUX.
- Make sure everyone on the set understands they must look INTO THE CAMERA and not down at the interviewee on the large PROGRAM screen.
- Produce:
- Hit AUTO FADE during the actual production to show the interviewee in PROGRAM as you introduce them.
- Ask a question to prompt them to talk.
- Cut back to a single shot to show whichever person on the set is asking the next question.
- Cut back to AUX to show your interviewee answering the question.
- Mute your computer when hanging up to avoid the “log off sound” in your program.
Final Steps
- Thank you for being considerate. Please make sure you take the time to leave the studio in the same way you entered.
- Pull up the curtain
- Put back the microphones on the white clip
- Turn down the lights
- For consistency and branding in each production, the host’s welcome and goodbye MUST contain the following: “from Studio A in the USC Annenberg School”
Support
- Media Technology Supervisors will be on hand during specific time periods to provide support for technical emergencies only.
- You can find Media Technology Supervisors throughout the Media Center
- Generally, supervisors are in the Media Center
- Monday – Thursday, 8:00a.m. – 7:00p.m.
- Friday, 9:00a.m. – 6:00p.m.
- Call (213) 740-5297 in an emergency, if no one is available on the floor.