


Intro to HTML
Hypertext Markup Language (HTML) is the standard coding language for creating web content. HTML defines the structure of a webpage and tells internet browsers how to display content to website visitors.
In this Intro to HTML tutorial, you’ll gain foundational knowledge of HTML including how to:
- Understand HTML code structure
- Add comments to HTML code
- Set up an HTML document
- Add text to a webpage
- Add media elements to a webpage
We’ve embedded interactive code editors in this tutorial so you can practice writing HTML code without leaving this webpage. If any of the interactive code editors don’t load, check out the Final Code section to see all the code used in this tutorial. You can also visit our Intro to HTML Tutorial collection on CodePen to view all the interactive code editors.
HTML Code Structure
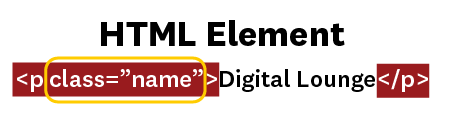
HTML code is written using HTML elements. Each HTML elements consists of a combination of various components:
- Starting tag: Written at the beginning of the element in between angle brackets (<>), the starting tag tells the browser the type of content.
- Attribute and value: Written inside the starting tag, the attribute and its associated value provide additional information to the browser about the content. The standard format is “attribute = ‘value'”.
- Content: The content written in between the starting and closing tags is displayed to the user.
- Closing tag: Written at the end of the element in between angle brackets (<>), the closing tag tells the browser when the specified element is complete.
In the image below, the starting and closing tags are highlighted in red and the attribute and value are circled in yellow.
Add Comments to HTML Code
Code comments are a common way to leave notes to yourself or other developers who work on the same project. Comments can help explain the code or organize the code into sections. Any code written in a comment is not displayed to a website visitor.
To write a comment in HTML, write <!-- to start your comment and --> to end your comment. The code below is an example of writing an HTML code comment to identify the “About Me” section of a portfolio website.
See the Pen HTML Comment by Digital Lounge (@annenbergdl) on CodePen.
Set Up an HTML Document
Every page on a website has its own HTML file.
Each HTML file starts with the document type declaration: <!DOCTYPE html>. This tells the web browser that it’s reading HTML code and ensures that your content displays correctly.
See the Pen HTML Document Type Declaration by Digital Lounge (@annenbergdl) on CodePen.
Next, use the starting <html> tag and the closing </html> tag to create a container for all your HTML code. Besides the document type declaration, the rest of your code should be written in between these tags.
In the starting <html> tag, declare the language the webpage is written in using the lang attribute. Set it equal to the HTML language code for the language you’re writing in.
See the Pen HTML Tags by Digital Lounge (@annenbergdl) on CodePen.
Metadata Section
In between the starting <html> and closing </html> tags, create the metadata section with the <head> and </head> tags. The HTML code between these tags won’t appear to the webpage visitor, but helps with backend workflows like character encoding, default zoom position, and SEO.
See the Pen HTML Head Tag by Digital Lounge (@annenbergdl) on CodePen.
In between the starting <head> and closing </head> tags, add the <title> and </title> tags to customize the page’s title. Please note that this title refers to the text that appears in the browser tab and not the title on the page itself.
See the Pen HTML Title Tag by Digital Lounge (@annenbergdl) on CodePen.
Additionally, you can use the <meta> tag to configure specific metadata information about the webpage. This metadata can help with SEO, accessibility, and more.
The <meta> tag is a self-closing tag, which means that you don’t need to include a closing tag.
In one of two <meta> tags, use the charset attribute to specify which character set the browser should use when rendering the webpage. It’s recommended to use the UTF-8 character set, as it covers most characters and symbols in the world.
See the Pen HTML Meta Character Set by Digital Lounge (@annenbergdl) on CodePen.
In another <meta> tag, set the name attribute to viewport. The name attribute specifies which type of metadata you’re configuring, and the viewport refers to the user’s browser.
In the same tag, add the content attribute to specific the viewport’s metadata. Set it equal to width=device-width, initial-scale=1.0. These values define the default width to be equal to the user’s browser width and define the initial zoom level to 1.
See the Pen HTML Meta Viewport by Digital Lounge (@annenbergdl) on CodePen.
Body Section
Lastly, add the opening <body> and the closing </body> tags after the metadata section. The body section contains all the content you want to display on your page.
See the Pen HTML Document Setup by Digital Lounge (@annenbergdl) on CodePen.
You’ve now set up your first HTML webpage! It’s important to repeat these steps for every webpage you create on your website.
Add Text to a Webpage
Now, we’re going to add various pieces of text to our webpage. To ensure these display to the webpage visitor, make sure you place them in between the starting <body> and closing </body> tags.
Headings
In HTML, there are six levels of headings to display titles and subtitles on a webpage.
Heading 1, or h1, defines your most important heading. The h1 is typically your page title. It’s important to only include one h1 element per webpage.
Heading 6, or h6, defines the least important heading.
A typical heading structure of a webpage includes:
h1– Page titleh2– Section titlesh3– Sub-section titles
Let’s add some headings to our HTML page!
Add <h1> and </h1> tags, with text in between them, to define the page title. In our example, we’ll add a page title of My Resume.
See the Pen HTML Heading 1 by Digital Lounge (@annenbergdl) on CodePen.
Next, add <h2>Experience</h2> and <h2>Education</h2> to create section titles.
See the Pen HTML Heading 2 by Digital Lounge (@annenbergdl) on CodePen.
Underneath the Experience section title, add <h3>Job 1</h3>, <h3>Job 2</h3>, and <h3>Job 3</h3> to create sub-section titles.
Underneath the Education section title, add <h3>Education 1</h3>, <h3>Education 2</h3>, and <h3>Education 3</h3> to create sub-section titles.
See the Pen HTML Heading 3 by Digital Lounge (@annenbergdl) on CodePen.
Paragraph Text
Most of the text on any webpage is paragraph text, also known as body text. Add the starting <p> and closing </p> tags, with text in between, to add paragraph text.
In our webpage, we’ll add the following paragraph text immediately after our page title (<h1>):
My name is First Last. I’m a web developer who is learning HTML!
See the Pen HTML Paragraph by Digital Lounge (@annenbergdl) on CodePen.
Lists
HTML has two different types of lists: ordered lists and unordered lists.
Ordered Lists
Ordered lists define a series of steps or other items that should be read sequentially. The ordered lists typically render with numbers for each list item.
To add an ordered list, add the starting <ol> and closing </ol> tags. In our webpage, we’ll add these after our Education 1 sub-section title.
In between the starting and closing tags, add the starting <li> and closing </li> tags to create a list item. The text in between the tags is the list item text. In our webpage, we’ll add three list items with the following text:
- Communication
- Journalism
- Public Relations
See the Pen HTML Ordered Lists by Digital Lounge (@annenbergdl) on CodePen.
Unordered Lists
Unordered lists define a series of items where the order doesn’t matter. The unordered lists typically render with bullet points for each list item.
To add an unordered list, add the starting <ul> and closing </ul> tags. In our webpage, we’ll add these after our Job 1 sub-section title.
In between the starting and closing tags, add the starting <li> and closing </li> tags to create a list item. The text in between the tags is the list item text. In our webpage, we’ll add three list items with the following text:
- Communicate with colleagues
- Develop custom webpages
- Update project trackers
See the Pen HTML Unordered Lists by Digital Lounge (@annenbergdl) on CodePen.
By now, you may have noticed that our HTML code is indented throughout. These indents help us quickly view the structure of our code, including which HTML tags are within others. This code formatting only impacts our development experience and doesn’t change how elements appear on the webpage. The two versions of code listed below display the same, but one is formatted to make it easier to read.
See the Pen HTML Unordered Lists by Digital Lounge (@annenbergdl) on CodePen.
See the Pen HTML Unordered Lists – No Format by Digital Lounge (@annenbergdl) on CodePen.
Add Media Elements to a Webpage
With HTML, you can add various media elements including images, video, and audio.
Images
To add an image to an HTML page, add the <img> tag. <img> is a self-closing tag. We’ve added the <img> at the very bottom of our webpage.
See the Pen HTML Images by Digital Lounge (@annenbergdl) on CodePen.
Add the source, or src, attribute to define the image you want to use. Set it equal to the file path of the image on the web.
Note that due to technical limitations, we can only use absolute file paths to images already on the web. To learn more about how to link to other image locations, check out W3 School’s HTML File Paths webpage.
See the Pen HTML Images SRC by Digital Lounge (@annenbergdl) on CodePen.
By default, images will appear in the original size. While CSS is the standard coding language for HTML style customization, you can use the width and height attributes to set an image size directly in the HTML code.
See the Pen HTML Images Size by Digital Lounge (@annenbergdl) on CodePen.
Additionally, add the alternative text, or alt, attribute to define the alternative text for the image. This text should describe the image and is used when the user can’t view the image due to slow connection, src attribute errors, or using a screen reader.
See the Pen HTML Images ALT by Digital Lounge (@annenbergdl) on CodePen.
Video
To add a video to an HTML page, add the starting <video> and closing </video> tags. We’ve added the <video> at the very bottom of our webpage.
See the Pen HTML Videos by Digital Lounge (@annenbergdl) on CodePen.
Add the source, or src, attribute to define the video you want to use. Set it equal to the file path of the video on the web.
Note that due to technical limitations, we can only use absolute file paths to videos already on the web. Additionally, videos in the interactive code editor won’t play. To learn more about how to link to other video locations, check out W3 School’s HTML File Paths webpage.
See the Pen HTML Videos SRC by Digital Lounge (@annenbergdl) on CodePen.
Add the controls attribute to add video player controls like play, pause, and volume.
See the Pen HTML Videos CNTRLS by Digital Lounge (@annenbergdl) on CodePen.
In between the staring and closing tags, add text to display in browsers that don’t support the <video> element.
See the Pen HTML Videos Text by Digital Lounge (@annenbergdl) on CodePen.
Audio
To add a audio to an HTML page, add the starting <audio> and closing </audio> tags. We’ve added the <audio> at the very bottom of our webpage.
See the Pen HTML Audio by Digital Lounge (@annenbergdl) on CodePen.
Add the source, or src, attribute to define the audio you want to use. Set it equal to the file path of the audio on the web.
Note that due to technical limitations, we can only use absolute file paths to audio already on the web. Additionally, audio in the interactive code editor won’t play. To learn more about how to link to other audio locations, check out W3 School’s HTML File Paths webpage.
See the Pen HTML Audio SRC by Digital Lounge (@annenbergdl) on CodePen.
Add the controls attribute to add audio player controls like play, pause, and volume.
See the Pen HTML Audio CNTRLS by Digital Lounge (@annenbergdl) on CodePen.
In between the staring and closing tags, add text to display in browsers that don’t support the <audio> element.
See the Pen HTML Audio Text by Digital Lounge (@annenbergdl) on CodePen.
Congratulations! You just coded your first webpage!
Final Result
See the Pen HTML Audio Text by Digital Lounge (@annenbergdl) on CodePen.
Final Code
<!DOCTYPE html>
<html lang="en">
  <head>
    <meta charset="UTF-8">
    <meta name="viewport" content="width=device-width, initial-scale=1.0">
    <title>Resume</title>
  </head>
  <body>
    <h1>My Resume</h1>
    <p>My name is First Last. I'm a web developer who is learning HTML!</p>
    <h2>Experience</h2>
    <h3>Job 1</h3>
    <ul>
      <li>Communicate with colleagues</li>
      <li>Develop custom webpages</li>
      <li>Update project trackers</li>
    </ul>
    <h3>Job 2</h3>
    <h3>Job 3</h3>
    <h2>Education</h2>
    <h3>Education 1</h3>
    <ol>
      <li>Communication</li>
      <li>Journalism</li>
      <li>Public Relations</li>
    </ol>
    <h3>Education 2</h3>
    <h3>Education 3</h3>
    <img src="https://annenbergdl.org/wp-content/uploads/2026/10/intro-html-featured-image.jpg" width="640" height="360" alt="Image of HTML code in the background with the HTML5 logo in the foreground">
    <video src="https://youtu.be/sl2xvTmPqnU?si=WHPJuC0GdcpWZYjN" controls>Your browser doesn't support the video tag.</video>
    <audio src="https://youtu.be/sl2xvTmPqnU?si=WHPJuC0GdcpWZYjN" controls>Your browser doesn't support the audio tag.</audio>
  </body>
</html>
Want to learn more about coding for the web? Check out our Code a Website workshop series!